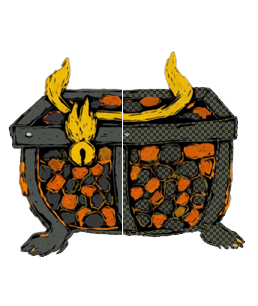
How I Made This Pattern Dithering Shader (And How You Can Use It)
Dithering is a classic technique, but most tools apply it to the entire image. But what if you want to add texture only to a character’s armor? In this guide, I’ll show you my selective dithering shader—a powerful tool I created so you can overlay complex animated patterns on specific colors in your artwork. And all this without writing a single line of code!

I’ll show you how to add texture to specific parts of your art.
What’s the trick? Targeting a single color
The main idea behind this shader is selectivity. Instead of affecting the whole image, it works only with the color you choose. Think of it as a magic brush that paints a pattern only on a specific color.
- Target Color (`target_color`): You simply use the eyedropper to pick the color you want to replace with a pattern.
- Color Tolerance (`color_tolerance`): This slider lets you decide how similar a pixel’s color must be for the shader to “catch” it. Low values mean only exact matches; high values include similar shades.
Time to create: customizing the texture
Here’s where it gets interesting. In my shader editor, you have full control over the look of the texture.
- Pattern Type (`pattern_type`): I’ve added several built-in patterns, like checkerboard, lines, or a 2x2 grid, so you can instantly change the texture.
- Dither Colors (`dither_color_1`, `dither_color_2`): You have two colors to create the pattern. You can go for classic black-and-white dithering or experiment with bright, contrasting colors.
- Dither Size (`dither_size`): Control the “grain” of the pattern—from fine 1x1 textures to large 16x16 blocks, perfect for pixel art.
Bringing your image to life: animated dithering
As with my other tools, I made sure you can animate the effects. Change `pattern type` Perfect for creating shimmering energy shields or metallic shine right in my online editor.
Under the hood: the shader code
I designed this shader to be powerful yet easy to use. All the complex logic is done for you, leaving only convenient sliders:
shader_type canvas_item;

// The color to target and how closely to match it
uniform vec4 target_color : hint_color;
uniform float color_tolerance : hint_range(0.0, 1.0, 0.01);

// The look and feel of the pattern
uniform int dither_size : hint_range(1, 16, 1);
uniform vec4 dither_color_1 : hint_color;
uniform vec4 dither_color_2 : hint_color;
uniform int pattern_type : hint_range(0, 3, 1);

// Animation controls
uniform bool animate_pattern = false;
uniform float animation_speed : hint_range(0.0, 5.0, 0.1);
Try it yourself: experiment with no code!
The coolest part is that you can play with this shader in my online app without any programming knowledge. Just upload your image and move the sliders in the interface. It’s the perfect way to quickly prototype and see results—even if you’re a programmer, because fast prototyping is key.
What’s more, I’ve added the ability to easily create multiple animation frames and apply different shader settings to each. This way, you can make truly unique animated effects.
Ready to add textures to your art?
Jump into my free shader editor and apply unique textures to your sprites right now.
Try the No-Code Editor